How to Build a Floating Desk with Shelving Inside a Closet
Step-by-Step DIY Tutorial with Photos + Video

So nice, I made it twice!
The first time around, I built a desk for my son who needed a dedicated space for his desktop computer. The dimensions of his closet allowed me to leave room on either side of the desk for “hidden” closet rods, making it a dual-purpose space.
Since I needed to leave that side space for hanging clothes, some of the steps in that build are slightly different. If that’s the kind of setup you’re going for, click here for the tutorial that walks you through how to adapt the project to include closet poles instead of shelving!
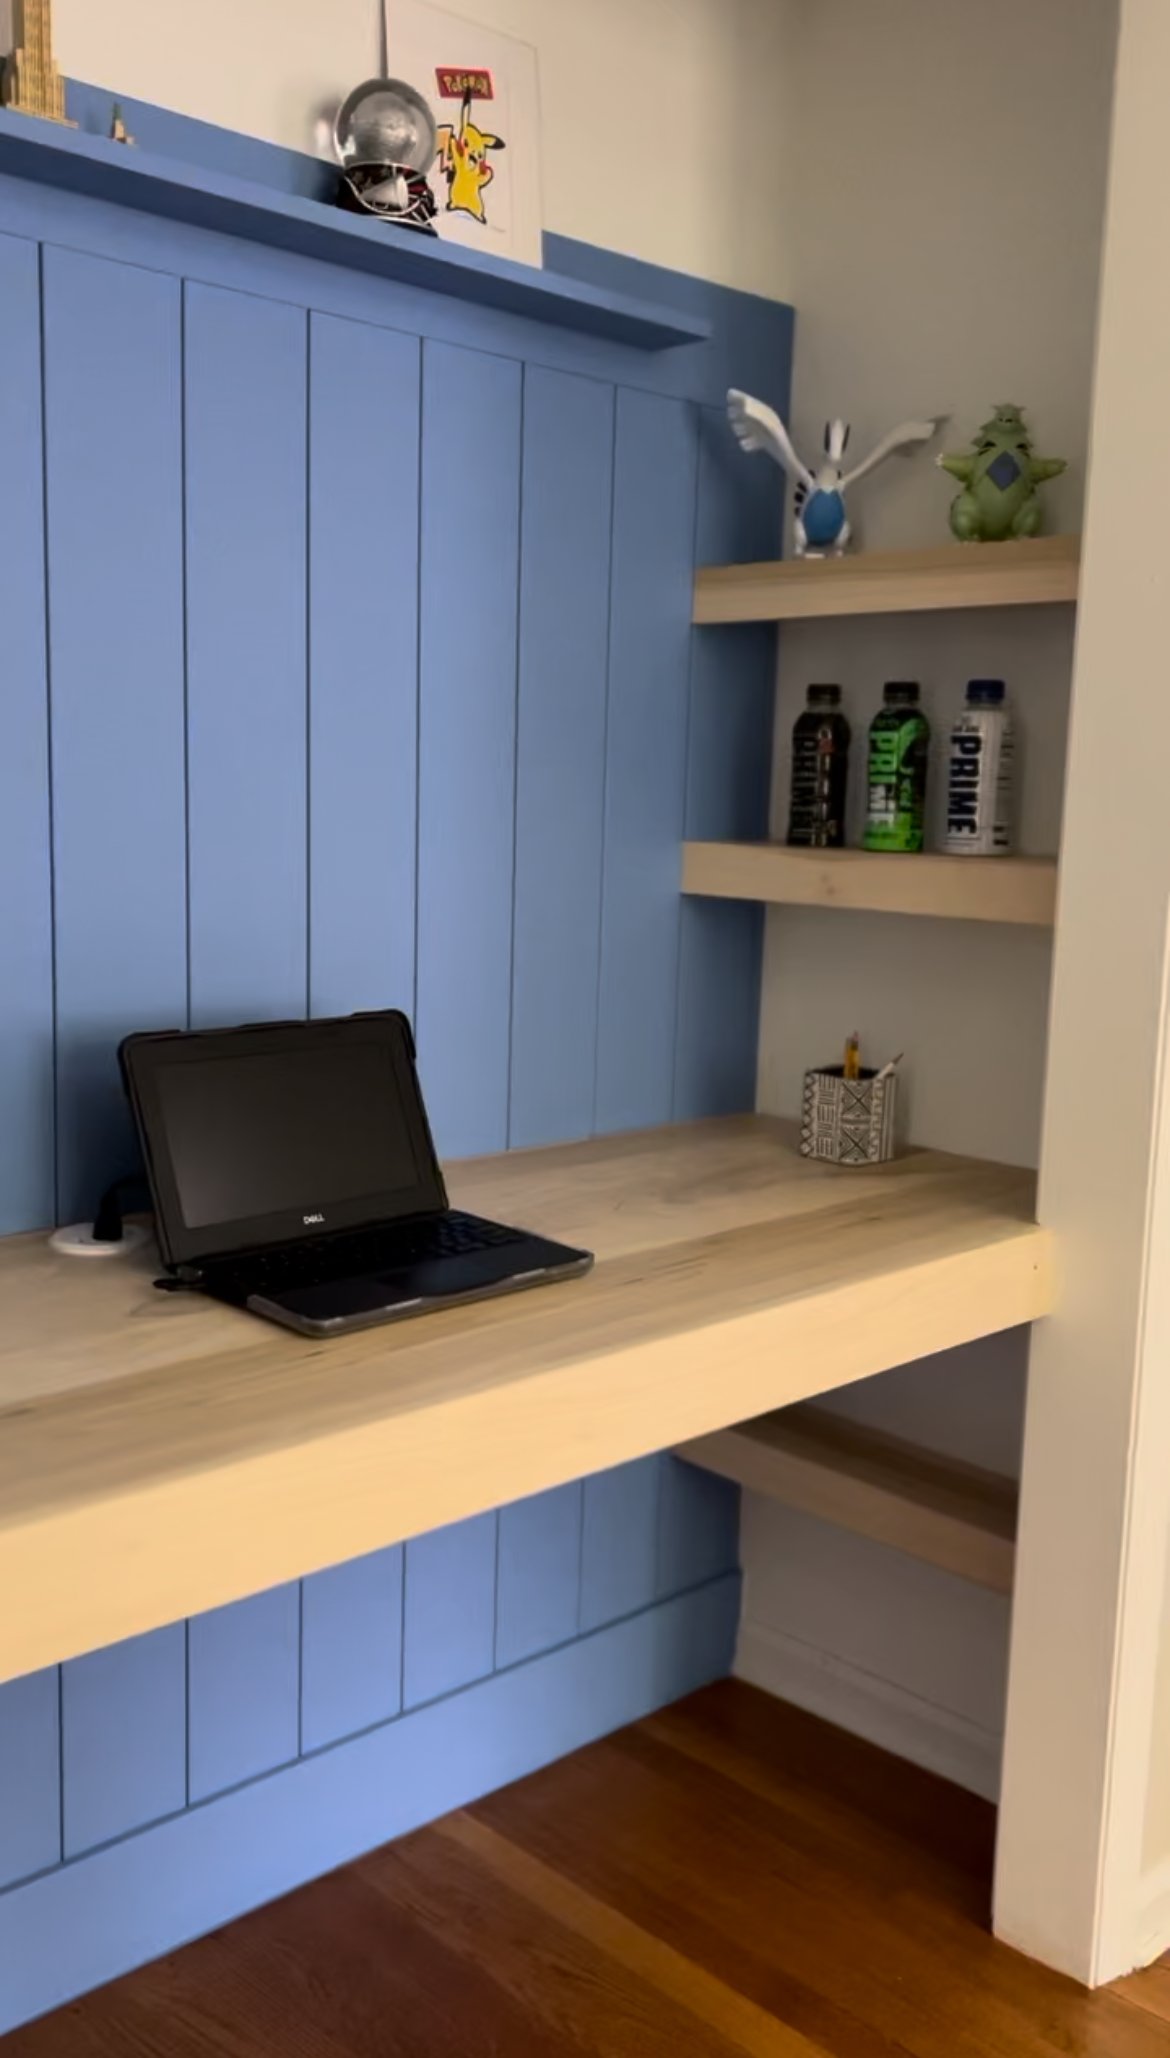
This closet-to-desk conversion is for a bestie’s son who is lucky enough to have TWO closets in his bedroom. So for his desk space I was able to run his desk from wall to wall and add some floating shelves for him to display some of his favorite items and hold some school supplies.
Read on for the full tutorial showing how I took this space from plain old closet to functional (and stylish!) desk area!
*Some of the links in this post are affiliate links, which means I may earn a small commission from qualifying purchases at no additional cost to you. I only recommend products I personally use and trust, or that I’ve thoroughly researched and recommend based on product reviews or brand reputation. Your support helps me continue creating helpful content for beginner DIYers. Thank you!
TOOLS
pry bar and/or nail puller
pocket hole jig (save) or what I use
table saw *Maybe. Read further for suggested alternatives
MATERIALS (length/quantity will vary based on the specific dimensions of your space)
**Click here for important info and helpful tips to consider when buying wood!
DESKTOP:
1x2 boards
-these will be used to create “cleats”-a ledge that the desktop will sit on. You’ll need slightly less than the length of the two sides, back and front of your desktop. These will be hidden, so I used cheap pine.
1x4 boards (width can vary based on preference)
-These boards will used for your desktop and for the front trim piece- I used Poplar. The length of your boards should be long enough to cover the desktop dimensions from left to right continuously with no cuts. The number of boards you’ll need will be based on the width of your boards and the depth of your space. Get enough to fill the space from front to back of the inside of the closet with no gaps (If you do not have a table saw to rip your last piece to the correct size, you may need to get one board in a smaller width to fill any remaining gap). Your trim piece will need to run the length of the closet opening from left to right. Tip: To save some money you can consider using plywood cut to size with a circular saw for your desktop. I preferred the look of poplar boards so the extra cost felt worth it.
2x4 board
-This piece will be added beneath the desktop as a center support and will run the depth of the desktop inside the cleats. This will be hidden. If you have an extra wide space, you can consider having 2 of these spaced out evenly.
wood filler
-you can buy a product like this BUT it’s cheaper and a better color match to make your own by mixing wood glue and sawdust to a putty-like consistency
-a combination of grits- I used 80, 120 and 220
stain (if needed- I did not stain mine)
-For a protective finish. I use this one because it’s water-based so it’s less likely to yellow
Desktop Power and Charging Station *Optional
Hole Saw drill bit *Optional
Screw Hooks *Optional
VERTICAL PLANK WALL WITH CENTER SHELF
1/2” x 5 1/2” MDF primed baseboard moulding
-I made my vertical boards 62” high with one horizontal piece above (overall height- 67.5”) and added an additional horizontal piece for the floor moulding
a few coins (I used nickels) for spacers between vertical boards
1x4 board
-center upper shelf
primer (if needed)
paint, eggshell or matte
-Color: Brazilian Blue (Benjamin Moore)
FLOATING SHELVES
1x2s for cleats
1x4s for shelf tops
1x3 for front trim piece
1/4” plywood for underbelly of shelves *optional
Step One: Prep the closet
Empty the Closet
Remove any existing doors, unwanted trim, molding, etc.
Repair/patch any holes or other wall damage that will not be hidden by the desk and wall planks.
If needed, paint the sections of the wall that will be exposed.
If you’re still deciding on a paint color for your vertical planks, you can paint some samples in the area that will be covered with the planks.
Step Two: Add cleats
Note- For a simpler approach, you can install vertical planks in full pieces before adding your cleats- see the note under Step Three
Using your stud finder and a pencil, mark where each stud is along each wall
Using a miter saw, cut your 1x2s to the appropriate length. You’ll secure each piece one at a time but they will create a rectangular frame for your desktop to rest on top of.
Measure and mark the overall height of your desk. Be sure to deduct the depth of your desktop boards, as they will lay on top of the cleats and add to the overall height. My desktop has an overall height of 31” and my desktop boards are 3/4” so I marked the top of my cleats to sit at 30 1/4” from the floor.
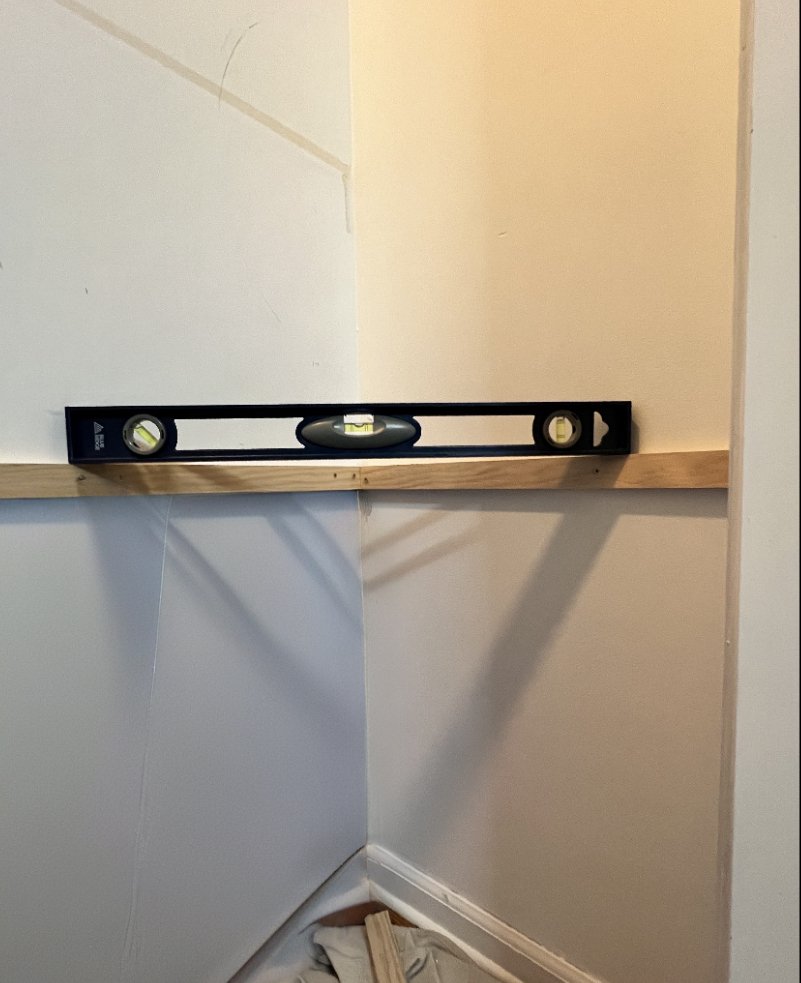
Before securing your cleats to the wall, I find it easier to hold the board in place and mark where your screws will go (aligned with studs) so that you can get your screws started beforehand. Once your screws are secured in the correct spots of your 1x2 (just enough so they don’t fall out), hold your board in place and use a level tool on top of it to ensure a level install. Drive your screws all the way through your 1x2, drywall and into the studs. Do this for the back and side walls, using a level each time. (Add the front piece later for easier access while installing the vertical planks.) As long as you have studs on each wall, you do not need to attach your 1x2s together at the corners.
**Leveling tip: Catty-corner your level so each end is on a separate 1x2 to ensure one board is not higher than the other. Do not rely on simply marking the height measured from the floor, as floors are not always level!
Step Three: Prep and Install Plank Wall
Before jumping into this step, I want to mention something I’d probably do differently next time to make the process a little easier. For this project, I measured and installed two separate sets of vertical planks- one above and one below the cleats and desktop. I did this intentionally because I wanted the desktop to look “sunken” into the wall planks for a more built-in look.
That said, it added extra cuts and time. A simpler approach would be to install full-length vertical planks first, then mount the cleats directly on top of them. You’d end up with small gaps between the desktop and the planks where the seams are, but honestly, it’s such a minor detail I don’t think it’s worth the extra effort unless you’re really going for that flush, custom look.
Determine the height of your overall plank wall. This may vary depending your space- the dimensions of the closet opening, the size of the room, the angle of your line of vision, etc. I was looking to make my planks go about 3/4 of the way up the wall with 1/4 of white visible at the top- not necessarily of the full wall but of the portion of the wall that is visible through the closet opening while standing in the room. So I stood back, eyeballed it, and marked it. For reference, my boards had an overall height of 67” from the floor.
Bottom planks: Measure from the floor to the bottom of your cleat. Mark and cut your MDF boards accordingly. I chose to paint all my planks before installing. You can paint later but be sure to paint the sides of the boards as you go because it’s impossible to get in between the boards once they’re all up! Measure and cut another board for the bottom horizontal floor plank. You may need to use a multi tool to cut out any existing floor molding in order for this piece to fit.
Upper planks: Mark the top and bottom edges of where your horizontal top plank will go. Then, measure the length of the back wall from left to right and cut your horizontal plank to fit. I installed this horizontal piece before adding the vertical planks.
Next, measure the height from the top of the desktop to the bottom of the horizontal plank- this will determine the length of your vertical planks. To get the most accurate measurement, lay at least one of your desktop boards (already cut to size) on top of the wall cleats, flush against the back wall.
Once you have your measurements, mark them on your MDF boards, cut them to size using a miter saw, and paint before installing.
Once your painted planks are dry, use a caulk gun to apply Liquid Nails adhesive to the back of each board in a large wavy pattern. (If you think you might want to remove these planks down the road, you could skip using adhesive to lessen wall damage and use more brad nails as needed). Use a level held vertically against your first plank before securing with 1-2 brad nails at the top, middle, and bottom of each plank. As you continue to add planks, use 2–3 coins at the top, middle and bottom of your seams (I used nickels) as spacers between each board to keep the seams evenly spaced.
After securing each board, use the same paint color as the planks to paint a line on the wall along the plank’s edge (if your wall color is dark already, you can skip this step). This ensures that no wall color shows through the gaps between planks. I started by installing the center board first and worked outward, which helped keep the end pieces similar in size and gave the whole layout a more symmetrical look. However, this required the use of a table saw to rip cut my end planks to the correct width. If you want to avoid having to do this, be strategic about your plank layout, gap sizes or plank sizes to possibly eliminate having to make these cuts. Another option would be to find some kind of trim to either fill or cover end gaps. Make sure the seams of the upper boards align with those below to create the appearance of one continuous plank wall. Secure the horizontal floor piece in front of the vertical boards using brad nails.
If needed, caulk any gaps between trim pieces and the wall, fill all nail holes with a small amount of wood filler, let dry, lightly sand, and spot paint.
Step Four: Prep and install the desktop
Cut your 1x4 boards to span the width of the closet, from the left wall to the right wall with no gaps. You'll need enough boards to cover the full depth of the closet from front to back. If you want to avoid using a table saw to rip the final board to size, you have a couple of options: you can buy a narrower board to fill the remaining space, or simply leave a small gap at the back and cover it with a corner trim piece for a clean, finished look. I would also lay your boards out ahead of time to find what looks best since there can be a good amount of variation between boards.
There are two basic ways to join boards to create your desktop: wood glue, or pocket holes with screws. Some might say using pocket hole screws is overkill- but I didn’t want to take a chance on the wood warping, so that’s what I (mostly) did. You’ll notice in the video there are several boards I did not join with pocket holes and appear to be glued. They are glued, and here’s why.
When I stopped at Lowe’s to pick up my materials, they didn’t have enough 1x4s in stock, and I really didn’t feel like making another trip. So in place of some of the boards, I bought a 1x12 that was actually made from three 1x4s already glued together. Sometimes you just have to pay for convenience and for about $10 more (and a little less work!), it was totally worth it.
Whether you're using wood glue, pocket holes, or both, bar clamps are essential for keeping your boards tightly aligned and straight during assembly.
If you're using only wood glue:
Apply a line of glue between each board, press them together, and secure with bar clamps. Be sure to wipe away any excess glue before it dries. Leave the boards clamped until the glue is fully dried, following the drying time recommended on your glue bottle.If you're using pocket holes and screws:
Lay out your boards with the bottom sides facing up- this ensures that your pocket holes will be hidden once the desktop is installed. Mark where you plan to place your pocket hole screws. The general recommendation is every 8 to 10 inches, but I spaced mine about 13 inches apart and had no issues. Your first and last holes should be about an inch from the ends of the board.Use a pocket hole jig to drill your holes. (If you're new to this, view a quick tutorial here.) I use a “fancy” pocket hole jig I was gifted and I love it! You’ll see it in the video but I also linked a more budget-friendly version in the materials list that works just as well.
Once all your pocket holes are drilled, clamp the boards tightly together, making sure your boards are perfectly aligned on the good side for the smoothest appearance, and drive the screws through the pocket holes to join the boards. You can remove the clamps once everything is securely fastened.
Tip: Depending on the size of your closet and the dimensions of the closet door opening, you may need to partially assemble the desktop outside the closet and join the remaining boards once they're inside. The first time I tried this, I built the entire desktop assuming it would fit through the opening — but it didn’t. Save yourself the trouble by testing how large of a piece will fit and assembling the final desktop in place if needed.
Sanding I try to do most of my sanding outside to keep dust out of the house- highly recommend it if you can! Before you start, make sure your sander's dust collection container is empty. The fine dust you collect from these boards can be saved and mixed with wood glue to create a color-matched wood filler later on.
Begin sanding with 80-grit sandpaper, moving the sander in the direction of the wood grain. You’ll know it’s working when the top layer is removed evenly; look for a subtle change in color and sheen across the surface.
Filling Gaps Even when working with straight boards, you’ll likely notice small gaps at the seams. You can buy pre-made wood filler, but making your own is super easy, inexpensive, and gives a much better color match. Just mix the fine dust from sanding with a bit of wood glue until it forms a putty-like consistency.
Traditionally, you’d apply this filler to your gaps as smooth as possible, let it dry, and then sand off any excess. But I cut a corner here. I add the glue and sprinkle some dust directly to the gaps during the sanding process and don’t even wait for it to dry before sanding over it. The downside could be that you might go through sandpaper a little faster since the glue can build up on it. But for me, the time saved is worth it.
The sanding process will continue after the desktop is fully installed inside the closet space. I held off installing the full desktop until after my wall planks were installed to give me more space to work in.
Lay your desktop (or the individual pieces, if assembling in place) onto the cleats. If your desktop was built in sections, now is the time to finish joining the boards together using the predrilled pocket holes from underneath.
Use a level to ensure the desktop is perfectly even before securing it in place. Adjust as needed to avoid any tilt or slope. If the desk isn’t level, you can add thin shims between the cleat and the desktop or gently adjust the cleats before fastening everything down. Double check with the level (side to side AND front to back) after each tweak to make sure it’s just right.
Use a brad nailer to secure the desktop to the cleats by driving nails down through the top of the desktop into the cleats below. This will keep everything snug and in place.
If you haven’t already, now’s the time to add the front cleat for your desktop. This piece will provide extra stability, allows you to attach a center support across the underbelly of the desktop, and gives you a spot to secure the front trim piece.
Each end of the front cleat should be secured into the studs on the inside front walls of the closet opening. If there’s existing trim in the way, you may need to notch it out with a multi-tool. In my case, I notched out the trim to fit the desktop but added a small filler block behind the front cleat so it wouldn’t run into the trim. Honestly, I can’t remember if that was intentional or just how it worked out but I’m including it here so the description matches what you’ll see in my photos.
For added stability, I measured the distance between the inside of the front cleat and the inside of the back cleat, then cut a 2x4 to serve as a center support (or aligned it with the nearest stud to center). I added two pocket holes to each end of the 2x4 center support so I could secure it to both the back and front cleats by driving screws into the studs from underneath. (Note: If there’s no gap between your front cleat and front trim piece, double-check the length of your screws. If they’re too long, they may poke through the front of the cleat and prevent your trim from sitting flush.)
Measure the width of your closet opening from left to right, then mark and cut a 1x4 to use as your front trim piece. This trim will give the illusion of a thicker, more substantial desktop. Align the trim with the front edge of the desktop, making sure the tops are flush. If there’s a gap between the trim and the front cleat, add small filler blocks behind the trim in the areas where you’ll be using your brad nails. I placed one on the left, one in the center, and one on the right. This gives you a solid backing to securely attach the trim piece.
Step Five: Floating shelves
Mark where you want your floating shelves to go. I chose to install two above the desk and one below on each side. When planning shelf placement, consider what you’ll be storing or displaying- the size and function of those items can help guide your spacing and layout.
Once you've decided on shelf placement, you'll build your floating shelves similar to how you built the desk.
Start by measuring, marking, and cutting 1x2s to use as cleats for the back and side walls. Cut an additional 1x2 to serve as a center support. This will provide extra stability and give you a solid spot to attach the front trim piece. Make sure the front edge of your center support aligns with the front ends of the side cleats so your trim piece will sit straight and flush.
Secure the cleats directly into the studs along the back and side walls. Drill a pocket hole into one end of the center support and use a clamp to hold it in place while attaching it to the back cleat. Choose a spot as close to center as possible, but be sure to avoid any screws already securing the cleat.
Next, cut 1x4 boards to size for the top of the shelf and a 1x3 for the front trim. Lay the top boards across the shelf from the left cleat to the right cleat. (Unlike the desktop, I didn’t join these boards together. Since the shelves aren’t likely to take as much wear and tear, I figured I could skip that step. So far, so good — they’ve held up perfectly!)
Push the top boards tightly together, then secure them in place with brad nails from the top down into the cleats. Finally, align the front trim piece and attach it using brad nails, making sure to nail into the side cleats and center support for a secure hold.
Optional: For a more finished look, you can cover the underside of your floating shelves. I did this on the upper shelves, but skipped it for the desk and lower shelves since the underside isn’t really visible unless you’re crawling underneath.
To do this, carefully measure the underside of each shelf, including the depth and width between the cleats. Mark your measurements on a sheet of 1/4" plywood, then cut the pieces using a circular saw or jigsaw. Attach them with brad nails or wood glue for a clean, seamless look.
Measure the desired length of your center shelf and cut a 1x4 to size. Hold the shelf in the exact spot you plan to install it, and mark where it lines up with the wall studs- these are the points where you’ll drill your pocket holes. I chose to place my pocket holes on the top of the shelf since the bottom would be more visible at the height it was installed. You can fill the holes with wood filler or use pocket hole plugs for a cleaner finish (sorry I didn’t catch a video of that!), but I still preferred to keep them as hidden as possible right from the start.
You’ll see in my video that I originally drilled my pocket holes... and then changed my mind about where I wanted the shelf to hang. 😅 So after shifting it over a bit, I had to mark and drill a new set of pocket holes which meant I ended up with two sets to fill. Oops! Just a reminder that mistakes are part of the process (and double-check your placement before you commit with the drill)!
If you haven’t already, sand, prime and paint your board to match the color of your vertical planks. Once your pocket holes are drilled, use a level to make sure your board is straight before driving your screws through the board and into the studs.
Step Six: Fill, Sand, and Seal
Once again, check all surfaces for any remaining gaps or nail holes and fill them with wood filler. I highly recommend making your own by mixing sawdust from your sander with wood glue. It creates a putty-like filler that blends much better, especially if you’re keeping the natural wood finish.
After filling, sand all wood surfaces starting with 80-grit sandpaper, moving in the direction of the grain. Follow up with 120 grit, and finish with 220 grit for a smooth, even finish. Lightly sand the front edge or corner of the desktop where arms might rest. Softening this area just a bit can make it more comfortable and prevent that sharp edge feel.
Once you’re happy with the results of sanding, use a brush or foam roller to apply your first coat of clear sealer over all wood surfaces. I recommend using a water-based sealer, like this one I used here. Water-based sealers dry faster, are low odor, and are less likely to yellow over time, unlike oil-based options, which can cause discoloration, especially on light woods.
Follow the recommended drying times listed on your sealer’s label. Once each coat is fully dry, lightly sand by hand with 220-grit sandpaper before reapplying. I applied four coats in total, and it’s held up beautifully over time.
Step Seven: Finishing Touches
To install the desktop power and charging station, use a 2" hole saw drill bit (or whatever size your specific unit requires) to cut a hole in the desktop. I placed mine in the center of the desk so it would stay hidden behind a laptop. My desktop was too thick to drill through from one side, so I had to drill halfway from the top and then finish the cut from underneath to get all the way through cleanly.
Note- Even if you don’t plan to install a built-in power station, you might still want to drill a hole for power cords to pass through since it’s a simple way to keep cables tidy and out of sight.
Since this closet didn’t have an outlet, I cut through the wall to access one nearby. To keep the cord hidden and out of the way, I screwed small hooks into the underside of the desktop to guide the cable neatly along a concealed path.
Once you’ve waited the recommended curing time listed on the sealer label, all you have left to do is style your desk and shelves in a way that is practical and looks good to you so you can finally enjoy your space! Whether it took a weekend or a few weeks, if you’ve made it this far, congrats! I hope you feel proud of the space you’ve created and all the little lessons you picked up along the way!
Share Your Project!
If you recreated this look or were inspired by this build, I’d love to see it!
Tag me @ProjectObsessedDIY on Instagram so I can cheer you on. 🛠️✨
Thanks for following along!